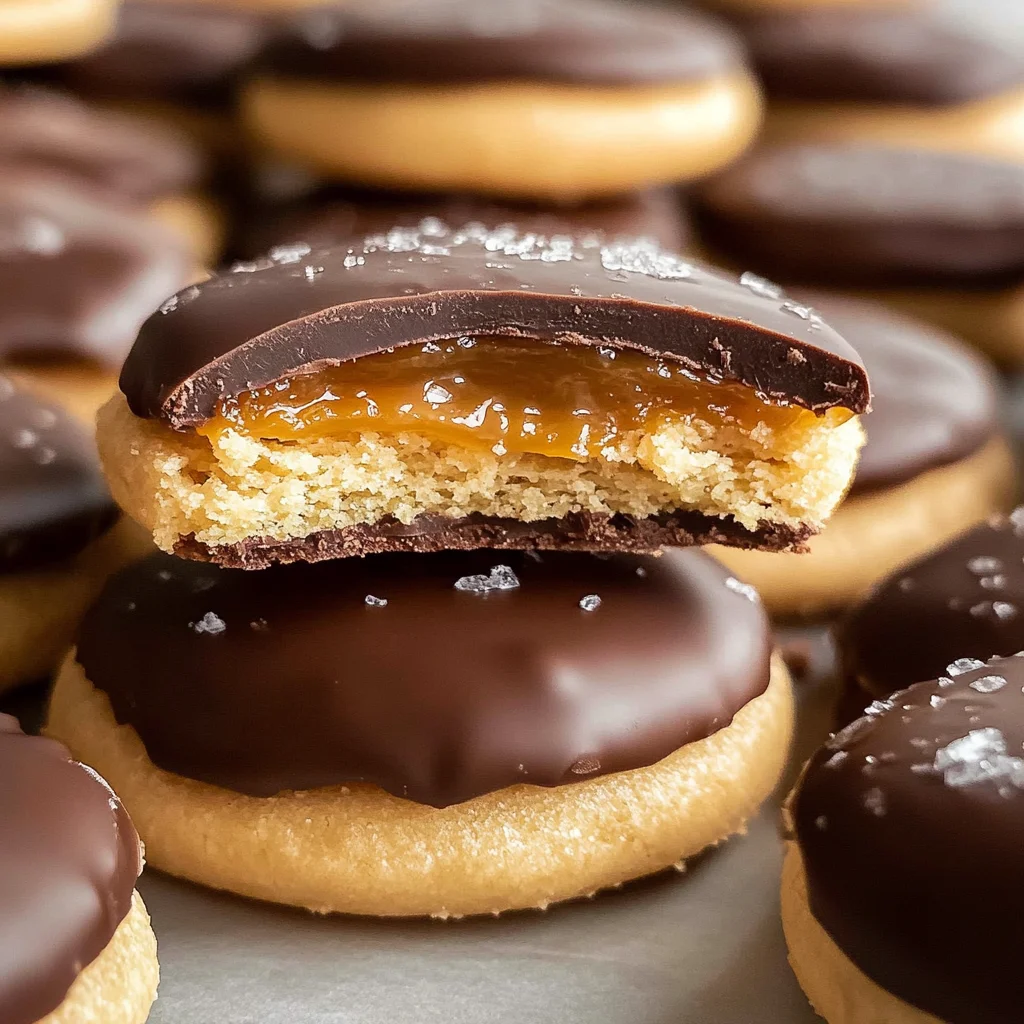
Homemade Twix Bites are a delightful treat that combines the crunch of vanilla wafer cookies with the sweetness of caramel and a rich chocolate coating. Perfect for gatherings, parties, or just a sweet snack at home, these bites are sure to please everyone. Their unique blend of flavors and textures makes them stand out, and they are easy to prepare in just 25 minutes!
Jump to:
- Why You’ll Love This Recipe
- Tools and Preparation
- Essential Tools and Equipment
- Importance of Each Tool
- Ingredients
- For the Caramel Layer
- For the Cookie Base
- For the Chocolate Coating
- How to Make Homemade Twix Bites
- Step 1: Preheat the Oven
- Step 2: Prepare Cookie Base
- Step 3: Shape the Caramel
- Step 4: Flash Freeze
- Step 5: Melt Chocolate
- Step 6: Coat Each Bite
- Step 7: Repeat Coating Process
- Step 8: Let Set
- How to Serve Homemade Twix Bites
- Individual Treat Bags
- Dessert Platter
- Movie Night Snack
- Coffee or Tea Pairing
- Birthday Party Highlight
- How to Perfect Homemade Twix Bites
- Best Side Dishes for Homemade Twix Bites
- Common Mistakes to Avoid
- Storage & Reheating Instructions
- Refrigerator Storage
- Freezing Homemade Twix Bites
- Reheating Homemade Twix Bites
- Frequently Asked Questions
- How can I customize Homemade Twix Bites?
- Can I make these bites gluten-free?
- How do I know when my Homemade Twix Bites are set?
- What if I don’t have semi-sweet chocolate chips?
- Final Thoughts
- 📖 Recipe Card
Why You’ll Love This Recipe
- Quick and Easy: With just a few simple steps, you can whip up these delicious treats in no time.
- Irresistible Flavor: The combination of crunchy vanilla wafers, gooey caramel, and smooth chocolate creates a flavor explosion.
- Versatile Treat: These bites are perfect for parties, movie nights, or as gifts. Everyone will love them!
- Customizable: Feel free to add your favorite toppings like nuts or sprinkles for an extra twist.
- No Baking Required: Enjoy the ease of making these bites without turning on the oven for baking.
Tools and Preparation
To make your Homemade Twix Bites, you’ll need some essential tools. Having the right equipment will make your process smoother and more enjoyable.
Essential Tools and Equipment
- Baking sheet
- Parchment paper
- Microwave-safe bowl
- Fork
- Freezer-safe sheet pan
Importance of Each Tool
- Baking sheet: Provides a flat surface for melting caramels and setting your bites.
- Parchment paper: Prevents sticking, making it easy to transfer your Homemade Twix Bites without mess.
- Microwave-safe bowl: Ideal for melting chocolate evenly without burning it.

Ingredients
Vanilla wafer cookies topped with sweet, sticky caramel and a rich chocolate coating make Homemade Twix Bites irresistible!
For the Caramel Layer
- 24 caramel squares
For the Cookie Base
- 24 round vanilla wafer cookies
For the Chocolate Coating
- 2 cups semi-sweet chocolate chips
How to Make Homemade Twix Bites
Step 1: Preheat the Oven
Preheat your oven to 250°F. Unwrap the caramel squares and place them a few inches apart on a parchment-lined baking sheet. Place this baking sheet on the middle rack of the preheated oven for about 5 minutes to soften the caramels. They should not melt but should become soft enough to reshape.
Step 2: Prepare Cookie Base
While the caramels soften, arrange the vanilla wafer cookies bottom sides up on a small parchment-lined sheet pan that will fit in your freezer.
Step 3: Shape the Caramel
Once softened, remove the caramels from the oven. While they are still warm, slightly flatten each caramel into a circle shape that fits on top of each wafer cookie. Place each flattened caramel directly on top of each cookie on the sheet pan.
Step 4: Flash Freeze
Place the sheet pan with all bites in the freezer for about 15 minutes to flash freeze them. This helps them hold their shape during coating.
Step 5: Melt Chocolate
When ready to coat, put 1 cup of chocolate chips in a microwave-safe bowl. Microwave in 30-second intervals until melted and smooth, stirring between intervals to ensure even heating.
Step 6: Coat Each Bite
Remove half of the flash-frozen bites from the freezer. Using a fork, dip each bite completely in melted chocolate. Allow any excess chocolate to drip back into the bowl before transferring it back onto a parchment-lined sheet pan.
Step 7: Repeat Coating Process
Repeat this process with the remaining chocolate chips and remaining frozen bites still in the freezer until all are coated.
Step 8: Let Set
Let your Homemade Twix Bites set at room temperature until all chocolate is fully hardened. Store them in an airtight container at room temperature for up to two weeks.
Enjoy your sweet creation!
How to Serve Homemade Twix Bites
Homemade Twix Bites make for a delightful treat perfect for various occasions. Whether you’re hosting a party or just enjoying a cozy night in, there are many creative ways to serve these delicious bites.
Individual Treat Bags
- Create small treat bags with a few Homemade Twix Bites. These make excellent party favors or gifts for friends and family.
Dessert Platter
- Arrange the bites on a decorative platter alongside fresh fruits or other sweets. This colorful display makes any gathering feel festive.
Movie Night Snack
- Serve Homemade Twix Bites as a special treat during movie nights. Pair them with popcorn and drinks for a fun evening at home.
Coffee or Tea Pairing
- Enjoy these bites with your favorite coffee or tea. The sweetness of the chocolate and caramel complements the rich flavors of your beverage.
Birthday Party Highlight
- Include Homemade Twix Bites on birthday party dessert tables. They are sure to be a hit among guests of all ages.
How to Perfect Homemade Twix Bites
Making perfect Homemade Twix Bites can elevate your treat game. Follow these helpful tips to ensure your bites turn out delicious every time.
Use quality chocolate: High-quality semi-sweet chocolate chips will melt smoothly and create a richer taste.
Don’t overheat caramels: Softening the caramels just enough is key. Overheating can cause them to melt instead of just soften.
Flash freeze effectively: Make sure to freeze the bites long enough for the caramel to firm up, which helps with coating them in chocolate.
Coat evenly: Dip each bite thoroughly in chocolate, letting excess drip off before placing it back on parchment paper for an even coating.
Store properly: Keep your Homemade Twix Bites in an airtight container at room temperature to maintain freshness and texture.
Best Side Dishes for Homemade Twix Bites
Serving side dishes with your Homemade Twix Bites can enhance the overall experience. Here are some great options that pair well with these sweet treats.
Fresh Fruit Salad: A mix of seasonal fruits adds a refreshing contrast to the richness of the bites.
Cheese Plate: Include assorted cheeses for a savory balance that complements the sweetness of the Twix Bites.
Mini Cupcakes: Offer an assortment of mini cupcakes alongside your bites for an extra touch of indulgence.
Yogurt Parfaits: Layer yogurt with granola and berries for a light, healthy option that pairs nicely with dessert.
Nut Assortment: A variety of nuts provides crunch and saltiness against the sweet flavors of the treats.
Chocolate Dipped Pretzels: For those who love both sweet and salty, chocolate-dipped pretzels are an excellent match!
Common Mistakes to Avoid
Homemade Twix Bites can be a delightful treat, but there are common pitfalls to avoid for the best results.
- Overheating the Caramel: If you let the caramels melt completely, they won’t hold their shape. Aim for just softening them in the oven for perfect texture.
- Skipping the Freezing Step: Not freezing the bites before coating them in chocolate can lead to messy results. Ensure you freeze them for at least 15 minutes for easy handling.
- Using Cold Chocolate: If your chocolate isn’t warmed properly, it may not coat the bites evenly. Melt it until smooth, stirring frequently to achieve a silky consistency.
- Not Storing Properly: Leaving your Homemade Twix Bites uncovered can cause them to dry out. Store them in an airtight container to maintain freshness.
- Rushing the Setting Process: It may be tempting to eat them right away, but letting them set at room temperature is crucial for a perfect chocolate shell. Be patient for best results.

Storage & Reheating Instructions
Refrigerator Storage
- Store in an airtight container.
- Keep in the refrigerator for up to 2 weeks.
Freezing Homemade Twix Bites
- Place in a freezer-safe container or bag.
- Can be frozen for up to 3 months; separate layers with parchment paper.
Reheating Homemade Twix Bites
- Oven: Preheat to 250°F and warm for a few minutes if desired.
- Microwave: Heat on low power in short intervals, being cautious not to overheat.
- Stovetop: Use a double boiler on low heat to gently warm if needed.
Frequently Asked Questions
Here are some common questions about making Homemade Twix Bites that might help you perfect this treat.
How can I customize Homemade Twix Bites?
You can add different flavors of caramel or use flavored chocolate for a twist. Consider adding nuts or sprinkles on top before the chocolate sets!
Can I make these bites gluten-free?
Yes! Use gluten-free vanilla wafer cookies as a substitute to enjoy these treats without gluten.
How do I know when my Homemade Twix Bites are set?
The chocolate coating should feel firm and not sticky when they are ready. Let them sit at room temperature until completely set.
What if I don’t have semi-sweet chocolate chips?
You can substitute with dark or milk chocolate chips based on your preference. Each will provide a unique taste!
Final Thoughts
Homemade Twix Bites are not only easy to make but also versatile enough for any occasion. Feel free to customize your treats with different flavors or toppings! Try this fun recipe today and enjoy a sweet snack that everyone will love!
Did You Enjoy Making This Recipe? Please rate this recipe with ⭐⭐⭐⭐⭐ or leave a comment.
📖 Recipe Card
Print
Homemade Twix Bites
- Total Time: 25 minutes
- Yield: Approximately 24 servings 1x
Description
Indulge in the delightful world of Homemade Twix Bites, a no-bake treat that perfectly marries the crunch of vanilla wafers with rich caramel and a smooth chocolate coating. These bite-sized snacks are incredibly easy to prepare in just under 30 minutes, making them ideal for parties, movie nights, or simply satisfying your sweet tooth at home. With their unique texture and flavor combination, these treats are certain to please everyone. Plus, they offer endless possibilities for customization with various toppings or flavor variations. Enjoy a deliciously fun experience that’s as enjoyable to make as it is to eat!
Ingredients
- 24 caramel squares
- 24 round vanilla wafer cookies
- 2 cups semi-sweet chocolate chips
Instructions
- Preheat your oven to 250°F. Unwrap the caramel squares and place them on a parchment-lined baking sheet for about 5 minutes until softened.
- While the caramels soften, position the vanilla wafer cookies bottom side up on a small parchment-lined sheet pan.
- After softening, flatten each caramel into a circle and place it on top of each cookie.
- Freeze the bites for about 15 minutes to hold their shape during coating.
- Melt chocolate chips in a microwave-safe bowl in 30-second intervals until smooth.
- Dip each frozen bite into melted chocolate using a fork and place them back onto a parchment-lined sheet pan.
- Allow the bites to set at room temperature until the chocolate hardens.
- Prep Time: 10 minutes
- Cook Time: 15 minutes
- Category: Dessert
- Method: No-bake
- Cuisine: American
Nutrition
- Serving Size: 1 serving
- Calories: 90
- Sugar: 8g
- Sodium: 25mg
- Fat: 5g
- Saturated Fat: 3g
- Unsaturated Fat: 2g
- Trans Fat: 0g
- Carbohydrates: 10g
- Fiber: <1g
- Protein: <1g
- Cholesterol: 0mg